
Integrating Google Calendar with your Webflow site can be a game-changer, especially if you need to showcase upcoming events, manage appointments, or allow visitors to easily view your schedule.
Fortunately, the integration here isn't all too complicated. From simple iFrame embeds to automated solutions using Zapier, there are several ways to get your calendar up and running on your website.
In this guide, I'll walk you through the most effective methods so you can choose the one that best fits your needs—no unnecessary steps, just practical solutions.
Methods for Adding Google Calendar to Webflow
1. Embed Google Calendar via iFrame (No-Code Solution)
The simplest and most straightforward method is embedding your Google Calendar using an iFrame.
This requires no technical knowledge, and you can have it live on your site in minutes. Here’s how:
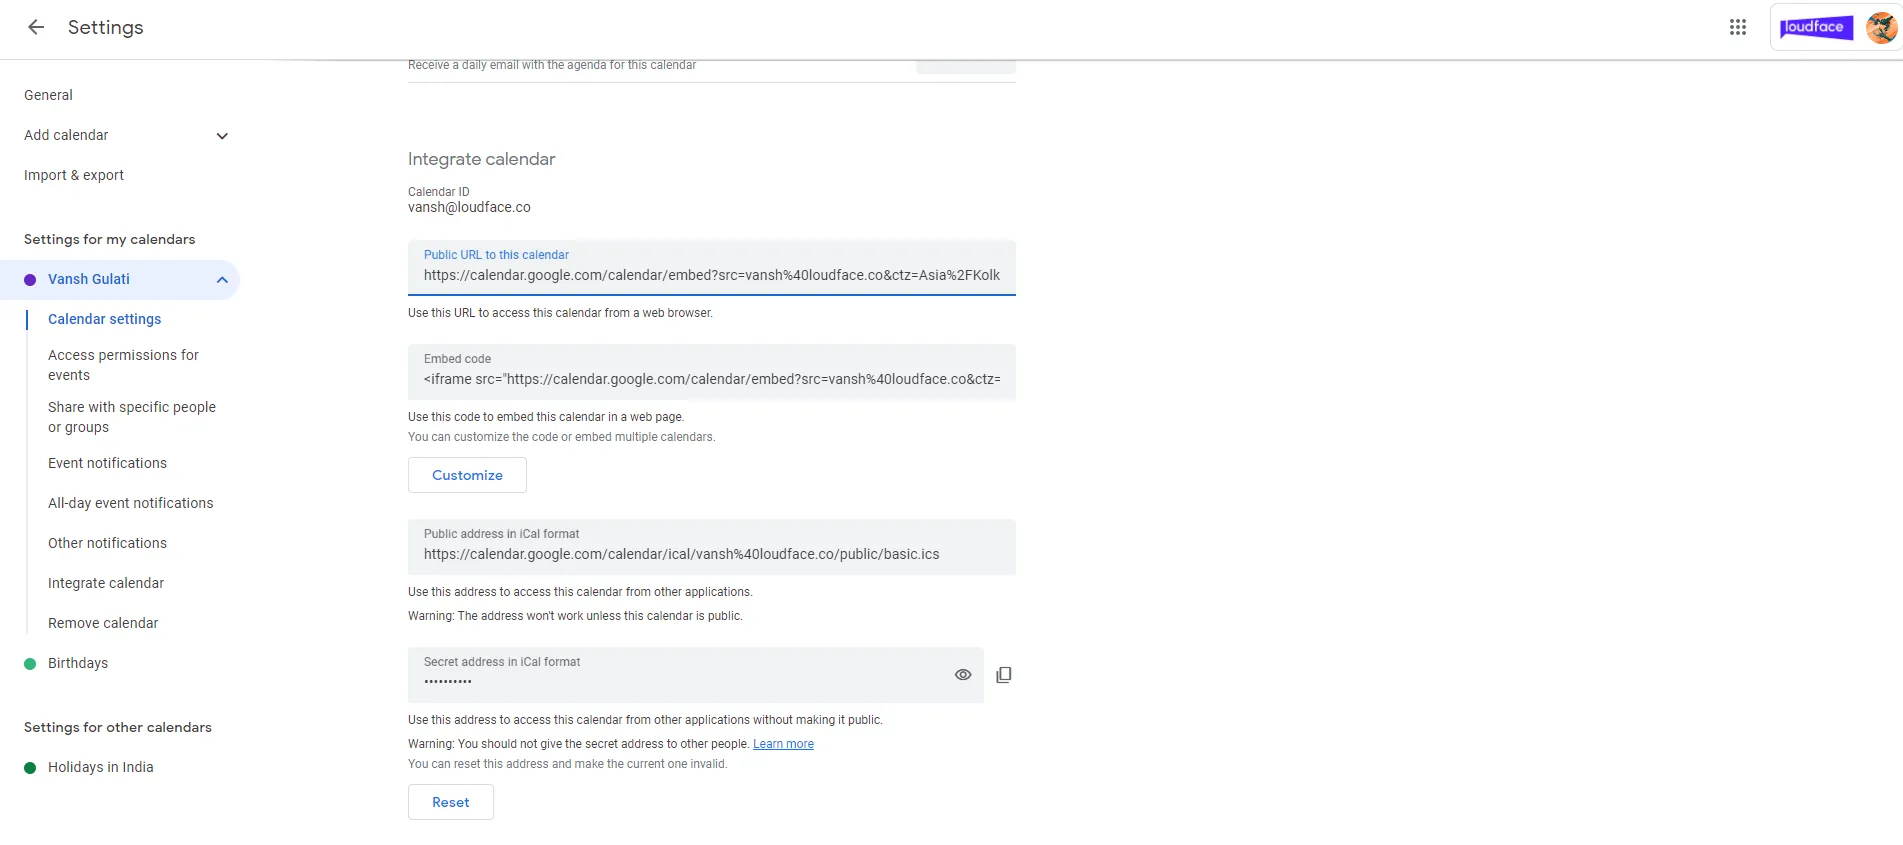
- Step 1: Open Google Calendar in your browser, go to the calendar you want to embed and select Settings and Sharing.
- Step 2: Scroll down to Integrate Calendar and copy the Embed Code.
- Step 3: In Webflow, add an Embed Element where you want the calendar to appear on your page.
- Step 4: Paste the Google Calendar iFrame code into the Embed element and hit publish.
While this method is quick and easy, it’s somewhat limited in customization and interaction. It’s best for those looking to display a static calendar without needing deeper integration.
2. Using Third-Party Widgets
For more functionality and customization without coding, third-party widget providers offer an excellent middle ground.
Tools like Elfsight and POWR provide ready-made Google Calendar widgets that integrate seamlessly into Webflow.
- Step 1: Choose a third-party tool like Elfsight or POWR and sign up for an account.
- Step 2: Customise your calendar widget directly on the platform. These tools often allow you to control appearance, add filtering options, and even adjust functionality for mobile responsiveness.
- Step 3: Copy the generated embed code once you’re happy with your widget.
- Step 4: Add an Embed Element to your Webflow page and paste the widget’s embed code.
They’re ideal for users who need more control over the calendar's appearance or want to add extra features like event filtering.
3. Zapier Integration for Automated Event Creation
This method is particularly useful for booking systems or event-driven websites where you want new Webflow form submissions to automatically create events in Google Calendar.
- Step 1: Set up a Zapier account and create a new Zap.
- Step 2: Select Webflow as the trigger app and choose the trigger event (e.g., new form submission).
- Step 3: Select Google Calendar as the action app, and choose the action event (e.g., create a new event).
- Step 4: Map the form fields from Webflow (e.g., name, email, event date) to the appropriate Google Calendar event fields.
- Step 5: Test your Zap to ensure the data is flowing correctly.
4. Custom API Integration (Advanced)
For those with technical skills or needing more customised control, integrating Google Calendar with Webflow via Google’s Calendar API offers the most flexibility.
This method lets you pull data directly from Google Calendar and display it on your Webflow site in real time.
- Step 1: Set up a Google Cloud account and enable the Google Calendar API.
- Step 2: Obtain your API key and set up authentication (OAuth 2.0).
- Step 3: Use JavaScript to fetch data from Google Calendar and display it dynamically on your Webflow site. You must write custom code and use Webflow’s Custom Code section.
Design and Customization Options
1. iFrame Customization (Basic Embed)
If you've chosen the iFrame method, customisation is a bit limited, but you can still adjust certain aspects:
Sizing: You can manually adjust the width and height of the iFrame by editing the embed code before pasting it into Webflow. Adjust the width and height parameters to suit your page's layout.
For example:
"YOUR-GOOGLE-CALENDAR-EMBED-URL" style="border: 0" width="800" height="600" frameborder="0" scrolling="no"
View Options: Google Calendar allows you to change how the calendar displays—Month, Week, Agenda, or a combination.
Styling with CSS: While you can't directly alter the calendar's built-in styles, you can still style the surrounding elements in Webflow using custom CSS.
2. Third-Party Widget Customisation
Third-party widgets like Elfsight and POWR offer significantly more customisation options compared to the iFrame method:
- Design Control: For example, you can set custom colours to match your brand and control the events' appearance (e.g., as a list or grid).
- Responsiveness: Third-party tools usually come with mobile responsiveness, making ensuring your calendar looks great across devices easier.
- Filtering and Event Styling: Many widgets allow you to customise which events appear based on categories, colours, or labels.
3. Custom API Integration Styling
If you're using a custom API integration, you have full control over how the calendar appears. You can design the calendar exactly as you want using CSS and JavaScript.
- Full Design Control: Since you're pulling in raw event data, you can style everything, from how individual events are displayed to the layout of the entire calendar.
- Dynamic Event Updates: You can display real-time event updates by integrating with the Google Calendar API. This lets you pull the latest event data without manually updating anything in Webflow.
Pro Tip: When designing your custom calendar, prioritise user experience. Ensure that event details are easy to read and that navigation between days, weeks, or months is intuitive, especially on mobile devices.
Troubleshooting Common Issues
Fortunately, most of these problems can be resolved quickly with the right troubleshooting steps. God knows I stumbled upon quite a few of these when I tried figuring this out myself.
1. Google Calendar Not Displaying Properly (iFrame Embed)
This error can happen due to several factors, including incorrect embed code, responsive design conflicts, or browser compatibility issues.
Fix: Double-check that you've copied the correct embed code from Google Calendar. Ensure you've properly pasted the iFrame code into Webflow's Embed element.
Also, make sure that your Webflow page is set up to handle the dimensions of the calendar. You may need to adjust the width and height of the iFrame for smaller screens or add custom CSS to make it responsive.
2. Embed Code Not Updating
Sometimes, after making changes in Google Calendar, you might notice that the calendar on your Webflow site isn't updating immediately.
Fix: Google Calendar's iFrame embed doesn't always reflect changes instantaneously. Refresh the cache or refresh your Webflow site by pressing Ctrl + F5 (Windows) or Cmd + Shift + R (Mac).
3. Zapier Integration Not Triggering
If you've set up automation using Zapier (e.g., adding new events to Google Calendar from Webflow forms), you may run into issues where the Zap fails to trigger or run as expected.
Fix: First, check the trigger event in Zapier to ensure it's set up correctly. Ensure Webflow is properly connected to Zapier and the form submission or other Webflow event triggers the Zap.
Review the Zapier logs to check for any errors or missing data causing the issue.
Common issues include:
- Incorrect mapping of fields (e.g., missing form data from Webflow).
- Zap limits are reached if you've hit your monthly task quota.
4. Google Calendar API Integration Errors
If you've opted for a custom API integration, more technical issues can arise, such as authentication problems or incorrect data retrieval from the Google Calendar API.
Fix: Authentication errors are usually the most common issue with API integrations. Ensure that your API credentials (API key or OAuth 2.0 tokens) are correct and that your Google Cloud account enables the Google Calendar API.
Check the API request syntax if you're not receiving the correct data from the API. Ensure you're using the right endpoint and that your request is formatted correctly according to Google's API documentation.
5. Slow Loading Times
If your calendar is slow to load or causing performance issues on your Webflow site, it may be due to the size of the calendar or the number of events being displayed.
Fix: Reduce the number of events displayed at once by switching to a Week or Agenda view in Google Calendar rather than showing a full month's worth of events.
Additionally, ensure your calendar embed code or widget is optimized for performance.
Use Webflow's Lazy Load option for images and external embeds. While this doesn't directly apply to Google Calendar, it helps optimize overall page loading times and can improve user experience.
Integrating Google Calendar with your Webflow site can be a game-changer, especially if you need to showcase upcoming events, manage appointments, or allow visitors to easily view your schedule.
Fortunately, the integration here isn't all too complicated. From simple iFrame embeds to automated solutions using Zapier, there are several ways to get your calendar up and running on your website.
In this guide, I'll walk you through the most effective methods so you can choose the one that best fits your needs—no unnecessary steps, just practical solutions.
Methods for Adding Google Calendar to Webflow
1. Embed Google Calendar via iFrame (No-Code Solution)
The simplest and most straightforward method is embedding your Google Calendar using an iFrame.
This requires no technical knowledge, and you can have it live on your site in minutes. Here’s how:
- Step 1: Open Google Calendar in your browser, go to the calendar you want to embed and select Settings and Sharing.
- Step 2: Scroll down to Integrate Calendar and copy the Embed Code.
- Step 3: In Webflow, add an Embed Element where you want the calendar to appear on your page.
- Step 4: Paste the Google Calendar iFrame code into the Embed element and hit publish.
While this method is quick and easy, it’s somewhat limited in customization and interaction. It’s best for those looking to display a static calendar without needing deeper integration.
2. Using Third-Party Widgets
For more functionality and customization without coding, third-party widget providers offer an excellent middle ground.
Tools like Elfsight and POWR provide ready-made Google Calendar widgets that integrate seamlessly into Webflow.
- Step 1: Choose a third-party tool like Elfsight or POWR and sign up for an account.
- Step 2: Customise your calendar widget directly on the platform. These tools often allow you to control appearance, add filtering options, and even adjust functionality for mobile responsiveness.
- Step 3: Copy the generated embed code once you’re happy with your widget.
- Step 4: Add an Embed Element to your Webflow page and paste the widget’s embed code.
They’re ideal for users who need more control over the calendar's appearance or want to add extra features like event filtering.
3. Zapier Integration for Automated Event Creation
This method is particularly useful for booking systems or event-driven websites where you want new Webflow form submissions to automatically create events in Google Calendar.
- Step 1: Set up a Zapier account and create a new Zap.
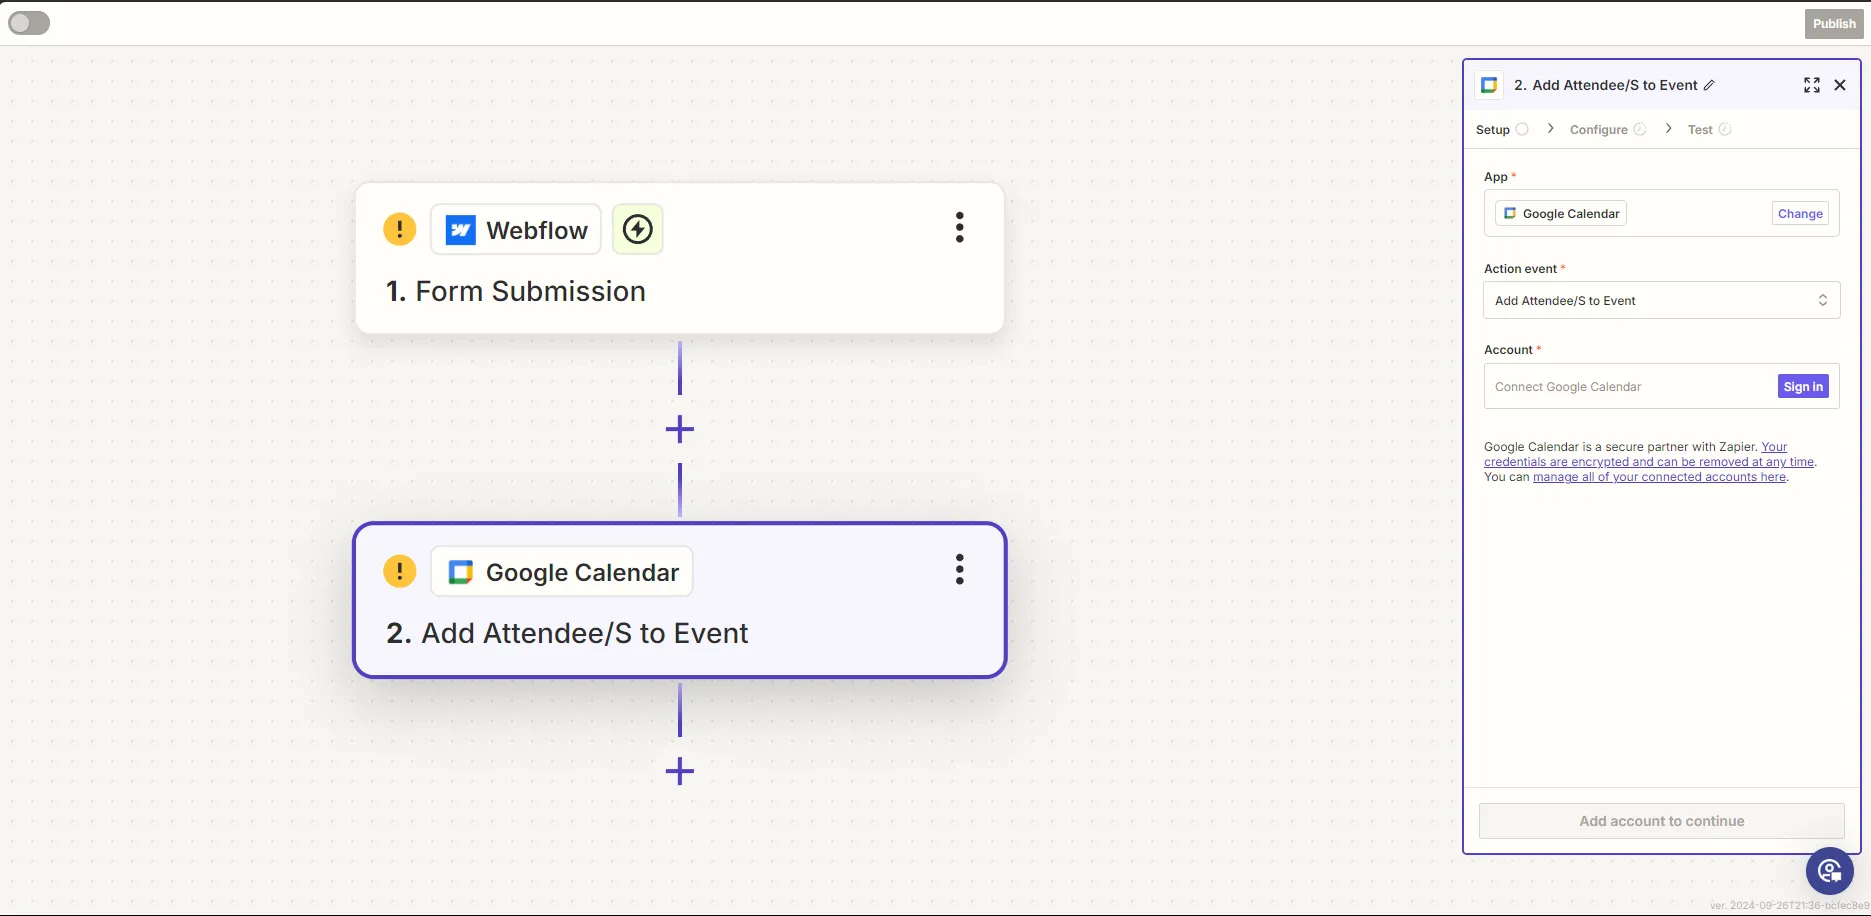
- Step 2: Select Webflow as the trigger app and choose the trigger event (e.g., new form submission).
- Step 3: Select Google Calendar as the action app, and choose the action event (e.g., create a new event).
- Step 4: Map the form fields from Webflow (e.g., name, email, event date) to the appropriate Google Calendar event fields.
- Step 5: Test your Zap to ensure the data is flowing correctly.
4. Custom API Integration (Advanced)
For those with technical skills or needing more customised control, integrating Google Calendar with Webflow via Google’s Calendar API offers the most flexibility.
This method lets you pull data directly from Google Calendar and display it on your Webflow site in real time.
- Step 1: Set up a Google Cloud account and enable the Google Calendar API.
- Step 2: Obtain your API key and set up authentication (OAuth 2.0).
- Step 3: Use JavaScript to fetch data from Google Calendar and display it dynamically on your Webflow site. You must write custom code and use Webflow’s Custom Code section.
Design and Customization Options
1. iFrame Customization (Basic Embed)
If you've chosen the iFrame method, customisation is a bit limited, but you can still adjust certain aspects:
Sizing: You can manually adjust the width and height of the iFrame by editing the embed code before pasting it into Webflow. Adjust the width and height parameters to suit your page's layout.
For example:
"YOUR-GOOGLE-CALENDAR-EMBED-URL" style="border: 0" width="800" height="600" frameborder="0" scrolling="no"
View Options: Google Calendar allows you to change how the calendar displays—Month, Week, Agenda, or a combination.
Styling with CSS: While you can't directly alter the calendar's built-in styles, you can still style the surrounding elements in Webflow using custom CSS.
2. Third-Party Widget Customisation
Third-party widgets like Elfsight and POWR offer significantly more customisation options compared to the iFrame method:
- Design Control: For example, you can set custom colours to match your brand and control the events' appearance (e.g., as a list or grid).
- Responsiveness: Third-party tools usually come with mobile responsiveness, making ensuring your calendar looks great across devices easier.
- Filtering and Event Styling: Many widgets allow you to customise which events appear based on categories, colours, or labels.
3. Custom API Integration Styling
If you're using a custom API integration, you have full control over how the calendar appears. You can design the calendar exactly as you want using CSS and JavaScript.
- Full Design Control: Since you're pulling in raw event data, you can style everything, from how individual events are displayed to the layout of the entire calendar.
- Dynamic Event Updates: You can display real-time event updates by integrating with the Google Calendar API. This lets you pull the latest event data without manually updating anything in Webflow.
Pro Tip: When designing your custom calendar, prioritise user experience. Ensure that event details are easy to read and that navigation between days, weeks, or months is intuitive, especially on mobile devices.
Troubleshooting Common Issues
Fortunately, most of these problems can be resolved quickly with the right troubleshooting steps. God knows I stumbled upon quite a few of these when I tried figuring this out myself.
1. Google Calendar Not Displaying Properly (iFrame Embed)
This error can happen due to several factors, including incorrect embed code, responsive design conflicts, or browser compatibility issues.
Fix: Double-check that you've copied the correct embed code from Google Calendar. Ensure you've properly pasted the iFrame code into Webflow's Embed element.
Also, make sure that your Webflow page is set up to handle the dimensions of the calendar. You may need to adjust the width and height of the iFrame for smaller screens or add custom CSS to make it responsive.
2. Embed Code Not Updating
Sometimes, after making changes in Google Calendar, you might notice that the calendar on your Webflow site isn't updating immediately.
Fix: Google Calendar's iFrame embed doesn't always reflect changes instantaneously. Refresh the cache or refresh your Webflow site by pressing Ctrl + F5 (Windows) or Cmd + Shift + R (Mac).
3. Zapier Integration Not Triggering
If you've set up automation using Zapier (e.g., adding new events to Google Calendar from Webflow forms), you may run into issues where the Zap fails to trigger or run as expected.
Fix: First, check the trigger event in Zapier to ensure it's set up correctly. Ensure Webflow is properly connected to Zapier and the form submission or other Webflow event triggers the Zap.
Review the Zapier logs to check for any errors or missing data causing the issue.
Common issues include:
- Incorrect mapping of fields (e.g., missing form data from Webflow).
- Zap limits are reached if you've hit your monthly task quota.
4. Google Calendar API Integration Errors
If you've opted for a custom API integration, more technical issues can arise, such as authentication problems or incorrect data retrieval from the Google Calendar API.
Fix: Authentication errors are usually the most common issue with API integrations. Ensure that your API credentials (API key or OAuth 2.0 tokens) are correct and that your Google Cloud account enables the Google Calendar API.
Check the API request syntax if you're not receiving the correct data from the API. Ensure you're using the right endpoint and that your request is formatted correctly according to Google's API documentation.
5. Slow Loading Times
If your calendar is slow to load or causing performance issues on your Webflow site, it may be due to the size of the calendar or the number of events being displayed.
Fix: Reduce the number of events displayed at once by switching to a Week or Agenda view in Google Calendar rather than showing a full month's worth of events.
Additionally, ensure your calendar embed code or widget is optimized for performance.
Use Webflow's Lazy Load option for images and external embeds. While this doesn't directly apply to Google Calendar, it helps optimize overall page loading times and can improve user experience.

An entrepreneur with a deep curiosity for technology, design, and business. This curiosity led Arnel to launch LoudFace, one of the first Webflow agencies in Europe and Middle East. Arnel’s career includes helping a familiar array of international B2B and B2C brands, including Radisson Hotels, Montblanc, Eraser, LIQID, Speckle, and more


