The Figma to Webflow plugin gets you 60% of the way and breaks every time the design has Auto Layout nesting or custom interactions. Manual conversion takes longer upfront but ships a faster, more accessible, properly responsive page. The five-step process: prep the Figma file (grid system, Auto Layout, named layers, exported assets), set up global styles in Webflow, build the page structure with containers and grid, upload assets, then layer in custom interactions. Pick manual when control and performance matter.
Regarding designing and building landing pages, Figma and Webflow are two tools that dominate their respective fields.
If you're using both tools in your workflow, you may have heard about the Figma to Webflow Plugin, which lets you automate transferring designs into Webflow.
While it's a great tool for quickly syncing designs, it's not always the best solution, especially if you aim for higher customization and control. Does that mean your only option left is the inferior manual conversion? Well, yes and no.
Manual conversion may take more time upfront, but the trade-off in control, customization, and performance often makes it the superior choice.
What is a Figma to Webflow conversion?
A Figma to Webflow conversion is the rebuild of a Figma design file into a live Webflow project, with the design system, responsive behavior, CMS structure, and interactions reproduced in Webflow's actual primitives. The deliverable is a working page that Webflow can host, the marketing team can edit, and Google plus AI engines can read cleanly. The unit being converted is not a screenshot. It is a design intent that has to survive the move into a browser-rendered, CMS-backed runtime.
This is a different job from a generic design handoff. A design handoff produces specs and assets that a developer interprets. A Figma to Webflow conversion produces an actual Webflow project where every section in the Figma file maps to Webflow containers, every typographic style maps to a global class, every component maps to a Symbol or Component, and every interaction in the Figma prototype maps to a Webflow Interaction. The shortcut path through the official Figma to Webflow plugin gets a working draft in minutes, but the output usually needs a manual cleanup pass before it ships, especially around Auto Layout nesting, responsive breakpoints, and named class structure.
Three signals separate a good conversion outcome from a fragile one:
- Global styles in Webflow match the Figma design tokens. Typography, spacing, and color values exist as named classes in Webflow, not as one-off inline overrides. Without this, every future page restarts the design system from scratch.
- Responsive behavior is built breakpoint by breakpoint, not auto-generated. Desktop, tablet, mobile landscape, mobile portrait. The Figma file rarely specifies all four. The Webflow build has to.
- HTML output stays clean enough for SEO and AEO extraction. No div soup, semantic headings, schema-friendly structure. A conversion that wins on visual parity and loses on extraction is a half-finished job.
How to choose your conversion approach
Three paths get a Figma file into Webflow, and most teams pick the wrong one because they pick on speed instead of fit. The plugin is fast and breaks on real designs. Manual rebuild is slow and ships clean. Hybrid (plugin for structure, manual for polish) is the path most production sites actually use. Match the approach to the file you have, not to the timeline you wish you had.
| Approach | Best for | Time required | Trade-off |
|---|---|---|---|
| Official Figma to Webflow plugin (one-shot import) | Single landing page tests, low-fidelity prototypes, designs already built on the plugin's preferred Auto Layout patterns | 15 to 60 minutes for the import, plus 2 to 4 hours of cleanup on a single page | Auto-generates class names that do not match a real design system, breaks on nested Auto Layout, ships heavy div structures that hurt extraction |
| Manual rebuild from scratch | Production marketing sites, brand-critical pages, sites where AEO and SEO extraction quality matters more than speed of first paint | 1 to 2 days for a single page, 1 to 2 weeks for a 5 to 10 page site, 4 to 8 weeks for a full site with CMS and programmatic templates | Slowest path. Pays back on every subsequent page because the global style system is reusable. Requires a real Webflow build operator, not a designer who has clicked into Webflow once |
| Hybrid (plugin for layout skeleton, manual for global styles and components) | Mid-complexity marketing sites where the Figma file is mostly Auto Layout clean but has some custom sections, and the team wants to skip the blank-canvas phase | 30 to 50 percent faster than full manual rebuild on a 5 to 10 page site, slower than plugin-only by roughly a day per page on cleanup | Requires discipline to overwrite plugin-generated classes with named classes, otherwise the site ends up with two parallel style systems that fight each other in week six |
| Reference-only (Figma stays the spec, Webflow built from scratch with the file open beside it) | Designs that were never meant to convert directly (Figma was used as concept work, not as a production blueprint), or files with heavy use of effects and components Webflow does not have native primitives for | Same as full manual rebuild, sometimes slightly longer because of the back-and-forth interpretation | Highest fidelity to design intent. Lowest fidelity to the literal Figma layers. Only works when the design lead is available to sign off on judgment calls |
| Skip Figma entirely, design in Webflow | Iteration-heavy marketing sites where the design and build teams are the same people, or where the spec is going to change inside the first two weeks anyway | Removes the conversion step entirely. Total build time often matches a manual rebuild because the design work is happening in the same surface | Loses the Figma artifact as a separate spec. Hard to hand off to a different builder later, hard to use for stakeholder review outside the Webflow Designer |
The decision usually comes down to one question. Is the Figma file a real production spec built on clean Auto Layout, or is it a concept deck with creative liberties? Production specs convert with the plugin or hybrid path. Concept decks need a manual rebuild or a reference-only approach. Treating a concept deck as a production spec is how a 1-week build slips to 6 weeks, and the slip always lands in week 3, when it is too late to reset the approach.
How long a Figma to Webflow conversion actually takes
Manual Figma to Webflow conversion is not a one-night sprint, but it is not a quarter either. The variance comes from how clean the Figma file is, how many breakpoints the design covers, and whether the Webflow project already has a working style system. Three honest windows below.
| Timeframe | What's possible | When it applies | Real example |
|---|---|---|---|
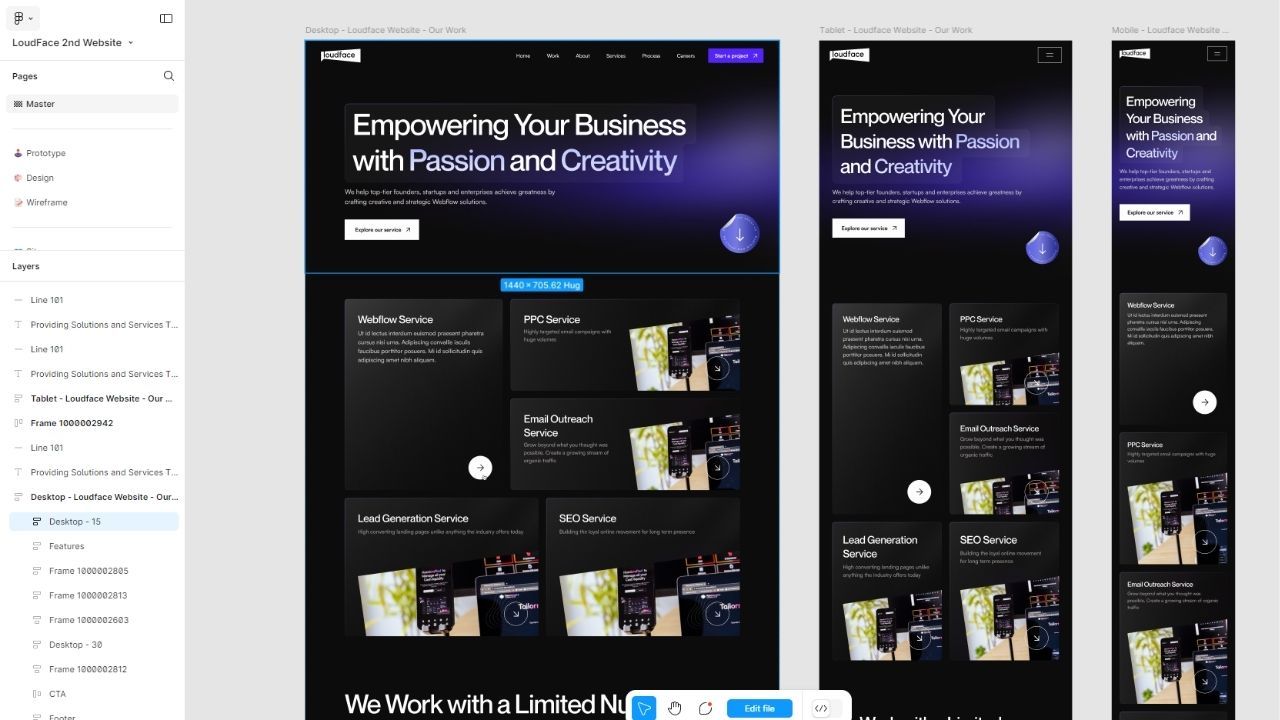
| 1 to 2 days | A single landing page or section conversion with global styles applied, responsive breakpoints set, and assets exported | Figma file is auto-layout clean, design uses an existing Webflow style system, no custom interactions | Internal LoudFace pattern for client landing page tests |
| 1 to 2 weeks | A 5 to 10 page marketing site converted manually with full responsive behavior, on-brand interactions, CMS structure stubbed | New Webflow project, global styles built from scratch, mid-complexity component library | Toku marketing site rebuild followed roughly this cadence per template family |
| 4 to 8 weeks | Full site conversion at production quality with CMS collections, programmatic SEO templates, custom interactions, accessibility passes | 20+ unique page templates, multi-locale support, or a regulated category that needs an audit-friendly output | Toku and TradeMomentum full site rebuilds both landed inside this window |
What determines speed is almost never Webflow itself. It is the Figma file. Designs built on auto-layout with a consistent grid and exported assets convert two to three times faster than freehand designs where every section uses different spacing tokens. If the Figma file is a mess, fix the Figma file first. Skipping that step turns a 2-week build into a 6-week build and the slip happens in week 3, when it is too late to reset.
How to Manually Convert Figma Designs to Webflow Pages?
Below is a step-by-step guide that will walk you through the entire process, from organizing your Figma file to optimizing your final Webflow design for responsive layouts.
1. Prepare and Organize Your Figma Design
Before building in Webflow, you must ensure your Figma design is clean and well-organized.
This preparation step is critical because it ensures a smooth and efficient transition from design to development.
- Create a Grid System in Figma: Make sure your design is built on a consistent grid system, such as a 12-column layout.
- Use Auto Layout in Figma: Auto Layout helps maintain consistency in spacing and alignment across different elements. This simplifies the design process and makes mimicking responsive behaviors in Webflow easier.
- Organize Layers and Groups: Name your layers clearly and group similar elements. This will save you time when manually recreating the design in Webflow.
- Export Design Assets: Identify all the images, icons, and SVGs used in the landing page. Export these assets from Figma at web-optimized sizes (usually in PNG, JPEG, or SVG format).
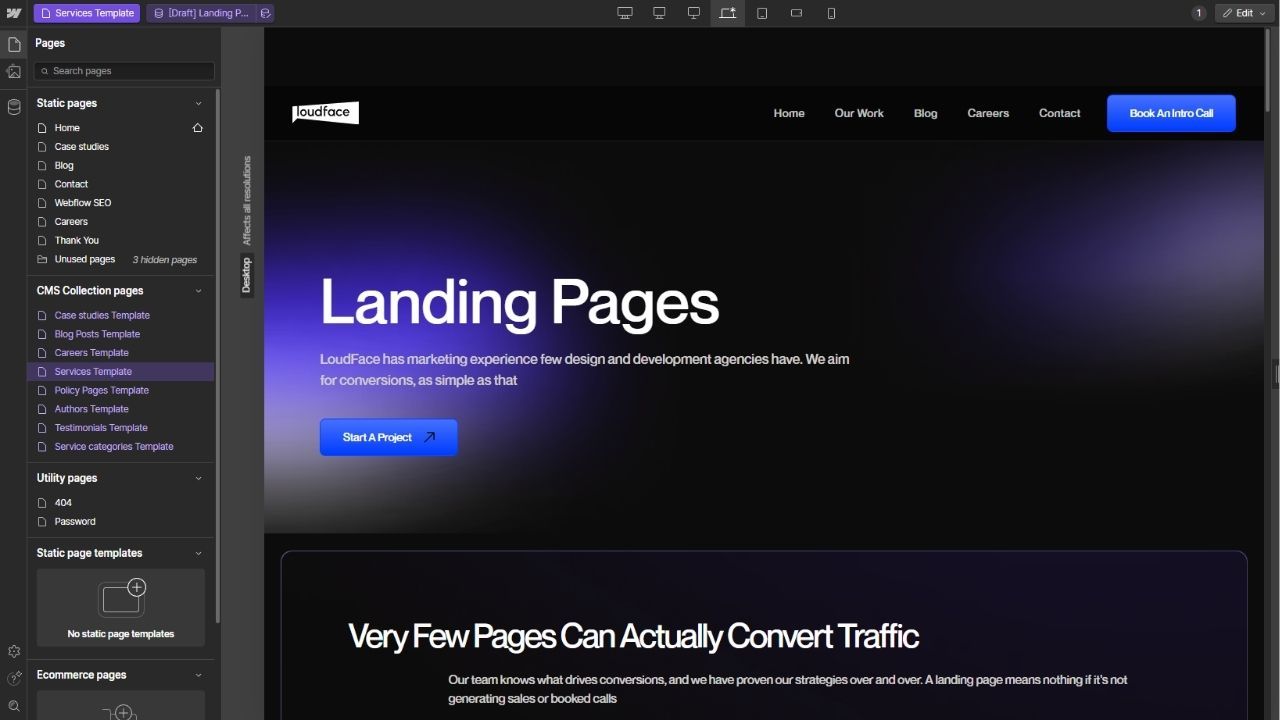
2. Set Up Your Webflow Project and Build the Page Structure
With your Figma design ready, the next step is to create a new project in Webflow and start building out the page structure.
- Create a New Project in Webflow: Start with a blank project or template matching your desired general layout for maximum flexibility.
- Set Up Global Styles: Defining your global styles in Webflow before adding content. This includes typography (font styles, sizes, weights), color schemes, and button styles. Make sure these match the ones used in your Figma design.
- Define the Page Structure: Use Containers, Sections, Div Blocks, and Grid elements to create the layout. Reference your Figma design grid to ensure proper alignment and spacing.
- Add Text and Headings: Copy and paste the text content from your Figma design into Webflow using the Text Block and Heading elements. Ensure that you apply the global typography styles you defined earlier.
3. Upload Images and Assets
Now that the structure is built, it's time to upload and add the images, icons, and other assets you exported from Figma.
- Upload Images to Webflow: Use Webflow's Asset Manager to upload all the images, icons, and SVGs needed for the landing page.
- Add Images to the Layout: Insert your images into the design by dragging them from the Asset Manager into the appropriate Div Blocks or Image Elements.
- Optimize Image Sizes: This ensures that your landing page loads quickly without sacrificing image quality.
4. Create a Responsive Layout
Responsive design is a must for modern websites, and Webflow makes it easy to adjust layouts for different screen sizes.
- Build the Desktop Layout First: Start by designing the desktop version of your landing page.
- Switch to Tablet and Mobile Views: Adjust the layout by stacking elements vertically, adjusting image sizes, and simplifying interactions where necessary.
- Use Flexbox and Grid Layouts: Use Flexbox to ensure that elements inside Div Blocks align properly and stay responsive across different screen sizes.
5. Add Custom Interactions and Animations
One of the key advantages of manually converting Figma designs is the ability to add custom animations and interactions. Webflow's Interactions Panel allows you to add advanced, user-triggered animations.
- Scroll Animations: Add interactions triggered by scroll events, such as content fading in as the user scrolls down the page. Use Webflow's Page Trigger feature to define these animations.
- Hover Effects: Use hover states for buttons or other interactive elements. You can adjust the hover color, scale, or opacity to create engaging call-to-action buttons.
- Custom Page Transitions: If your landing page links to other parts of your website, you can add smooth transitions between pages for a more polished user experience.
6. Test and Publish the Page
Before you publish your landing page, you must test it thoroughly to ensure it looks and functions perfectly across all devices.
- Test Responsiveness on Different Breakpoints: Use Webflow's Preview Mode to check how your landing page looks on desktop, tablet, and mobile devices. Adjust margins, paddings, and text sizes where needed.
- Test Interactions and Animations: Ensure all interactions and animations work as intended without slowing down the page.
- Optimize for SEO: Add meta tags alt text for images, and ensure your page has optimized headings and content for search engines.
Why Consider Manual Conversion Over Automation?
While the Figma to Webflow Plugin offers convenience, there are several reasons why you might want to take the manual route instead:
1. Customization Control
With manual conversion, you have total control over your landing page's appearance and functions. You can make pixel-perfect adjustments, fine-tune every element, and ensure the final result matches your vision.
This level of control is essential if you're working on a high-profile project where design precision is non-negotiable.
2. Cleaner Code
When you manually build your landing page in Webflow, the generated HTML and CSS will likely be cleaner and more efficient than what you'd get from an automated conversion.
Automation tools can sometimes produce bloated or redundant code, negatively impacting your page's performance.
3. Flexibility for Adjustments
Manual conversion gives you the flexibility to make quick adjustments as you build.
Why Consider Figma to Webflow Plugin Instead?
As with any method, manual conversion comes with its challenges.
1. Time-Consuming
While automation can sync a design with a few clicks, manual conversion requires much hands-on work, especially for more complex designs.
You'll need to carefully recreate the structure, style, and interactions from Figma in Webflow. This can take several hours or even days, depending on the project's size.
As such, it may not be the best option for projects with tight deadlines. It's essential to weigh the time investment against the need for customization and precision.
2. Requires Webflow Knowledge
While Webflow is known for being user-friendly, fully utilizing its features (such as Flexbox, Grid layouts, and the Interactions Panel) does require some experience.
The manual conversion process might come with a steep learning curve for users unfamiliar with these tools.
Without a solid understanding of Webflow's layout and responsive design features, you might end up with a page that looks good on desktop but breaks at different screen sizes.
3. Potential for Human Error
Whether it's missing a key element, incorrectly aligning content, or forgetting to add an interaction, the chances of small mistakes creeping in are higher here.
For example, it is easy to miss details like consistent padding or spacing between elements, especially if your Figma design includes intricate layouts.
4. Inconsistent Design Translations
While manual conversion allows for precise control, it can also lead to inconsistencies if elements aren't properly replicated from Figma to Webflow.
This can result in designs that don't quite match the original Figma mockup, especially when it comes to complex, multi-layered elements or interactions.
Working on a B2B SaaS or fintech growth program? We run a free 30-minute AI citation audit. We open the dashboard, walk through the prompt graph for your category, and tell you what's working (or who else can help). See our public pricing first if that helps.
Frequently Asked Questions
How do you manually convert Figma designs to Webflow pages?
The process involves organizing your Figma file, recreating the layout in Webflow's visual editor, and then optimizing the final design for responsive breakpoints.
Why choose manual Figma to Webflow conversion over automation?
Manual conversion gives you more control over clean code structure, responsive behavior, and Webflow-native interactions that automated plugins may not handle well.
When should you use the Figma to Webflow plugin instead of manual conversion?
The plugin is better when speed matters more than precision, as manual conversion comes with challenges like longer build times and more effort for complex designs.