As someone who's spent countless hours perfecting workflows between my dev, design, and SEO teams, I can tell you that the right tools DO make all the difference.
It's no surprise that we at LoudFace are Webflow experts. Despite its amazing features and stunning designs, Webflow can sometimes be slightly restrictive.
As your projects grow, so do the demands for automation and seamless integration with other tools. That's where Zapier steps in—a platform that's become indispensable in my toolkit for automating workflows and connecting apps without coding.
Before we get started, I am gonna assume you already have live and functioning accounts on Webflow and Zapier.
Creating Your First Zap with Webflow
Automating repetitive tasks is like having a personal assistant for your web projects. It might be enticing to try out all the available options, but it's best to keep this to redundant, time-consuming tasks.
Step 1: Choosing Webflow as the Trigger App
A trigger is an event that starts your Zap (automation task / process). Webflow offers several powerful triggers that allow you to automate various tasks:
- Form Submissions: Use this trigger whenever a form is submitted on your Webflow site. Automate actions like adding leads to your CRM, sending confirmation emails, or notifying your team on Slack.
- New CMS Item: Whenever a new CMS item is created, you can automatically update your database, publish content to other platforms, or even post on social media.
- E-commerce Orders: Automatically manage orders, track inventory, or send customer follow-ups. Check out Webflow's ecommerce capabilities to see what's possible.
Step 2: Setting Up the Trigger
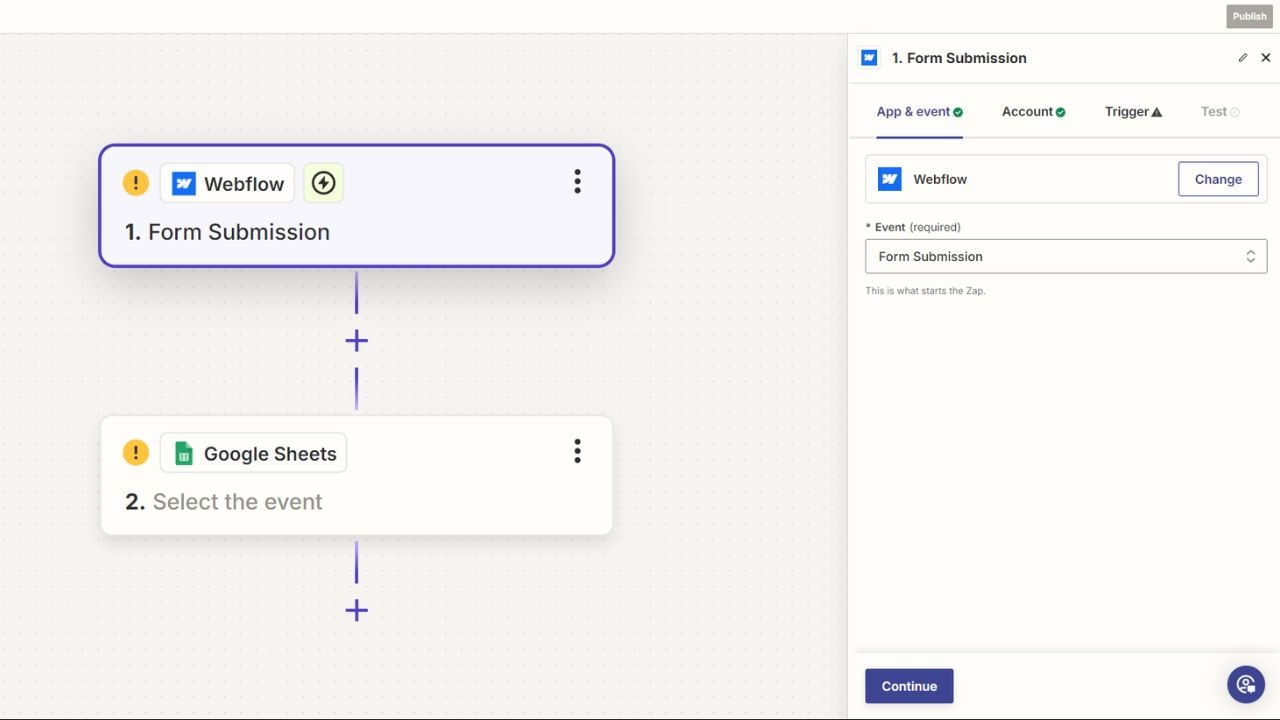
After selecting your trigger, you must connect your Webflow account to Zapier. Here's how to do it:
Connect Your Account: If you haven't already, Zapier will prompt you to log in to your Webflow account and authorize access. This is necessary for Zapier to pull data from Webflow.
Select the Trigger Event: The specific event (e.g., Form Submission) will kick off your Zap.
Customize the Trigger: Depending on the trigger, you may need to specify details like the site, form, or CMS collection you're working with.
Pro Tip: Ensure the data you're working with is clean and well-organized. For example, if you're triggering a Zap based on form submissions, ensure all fields in your Webflow forms are correctly named and consistently used across your site.
Step 3: Choosing the Action App
Once your trigger is set, it's time to choose what happens next—the action. Zapier offers thousands of apps to integrate with Webflow, allowing you to create highly customized workflows:
- Google Sheets: Automatically log form submissions or CMS data into a Google Sheet for easy tracking and reporting.
- Mailchimp: Instantly add new subscribers from your Webflow forms to Mailchimp lists and segment them based on their submissions.
- Trello or Asana: Streamline project management by creating tasks in Trello or Asana whenever there's a new CMS item or form submission.
Here’s a guide from Webflow’s own site about creating cool and efficient Zaps.
.jpeg)
Step 4: Setting Up the Action
After choosing your action app, it's time to configure what happens next. Zapier's interface makes this straightforward:
- Configure the Action: Specify the details, such as which Google Sheets or Trello board to update. You'll be prompted to map fields from Webflow to your chosen app.
- Field Mapping: Ensure that data from Webflow (e.g., form fields or CMS items) correctly maps to the fields in your action app. For example, map a "Name" field from a Webflow form to a corresponding field in Google Sheets or Mailchimp.
- Test the Zap: Test your Zap with sample data before going live. This step is crucial for catching any potential issues. Zapier will walk you through the testing process, showing you exactly what data is being passed from Webflow to your action app.
Pro Tip: After testing, review the results carefully. Double-check your field mappings and trigger settings if the data doesn't appear as expected. Debugging now can save a lot of hassle down the line.
Advanced Integration Ideas and Use Cases
Here are a few Zaps I use often and ones I mean to start as soon as I get some time, haha.
1. Content Management Automation
Content Management Automation: Automatically push new CMS items from Webflow to other platforms like Reddit, Medium, or your social media accounts. This is perfect for keeping all your content channels updated without lifting a finger.
Dynamic Content Updates: Automate the process of updating content across your site. For example, if you manage a content calendar in Google Sheets or Airtable, you can set up a Zap to automatically update your Webflow CMS with new content or edits.
2. Lead Management and CRM Integration
Automated Lead Distribution: Instantly route leads to different team members or departments based on the information they provide in your Webflow forms.
Lead Nurturing: Automate follow-up emails and lead nurturing sequences using Mailchimp, ActiveCampaign, or another email marketing platform. This helps keep your leads engaged without manual intervention.
3. E-commerce Optimization
Inventory Management: Keep your inventory in sync across multiple platforms by automating updates whenever an order is placed or a product is added. This is especially useful if you sell through multiple channels like Shopify, Amazon, and your Webflow site.
Customer Engagement: Automate customer follow-ups post-purchase. Send order confirmations, shipping updates, and personalized thank-you notes or discount offers via email or SMS.
4. Marketing Automation
Audience Segmentation: Use data from Webflow forms to automatically segment your audience in your email marketing platform. This allows for more targeted and personalized campaigns.
Social Media Posting: Automate the posting of new content to your social media channels directly from Webflow. This ensures your content gets in front of your audience without manual posting.
5. Project Management
Task Automation: Automatically create tasks in project management tools like Trello, Asana, or Monday.com based on updates in Webflow. This keeps your team aligned and ensures that nothing falls through the cracks.
Team Notifications: Keep your team informed of important real-time updates by automating notifications through Slack or Microsoft Teams.